01First look 02Photos 03The homestead 04Ways to participate 05Ventures 06Location 07How we build 08Water & energy 09Food & animals 10Olives 11Tools 12Dream builds 13Inquire
First look

A first look at the land.

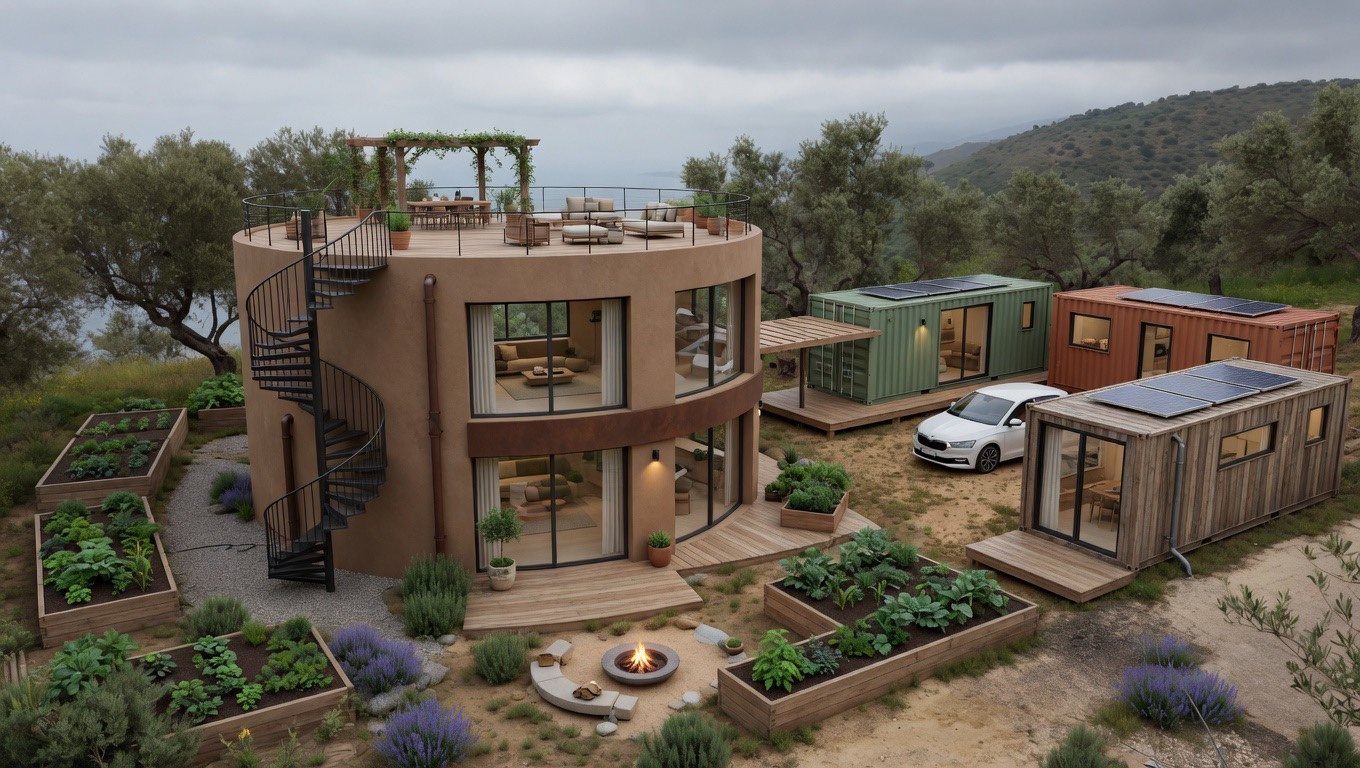
Photorealistic render. The cistern house among the olives, with its deck and the hills behind.
The cistern house among the olives, with its deck and the hills behind. · photorealistic render
Photorealistic render. The container home, with a vine pergola over the front deck, a clear rooftop terrace, and the solar water heater on the wooden shade.
The container home, with a vine pergola over the front deck, a clear rooftop terrace, and the solar water heater on the wooden shade. · photorealistic render
Photorealistic render. About 100 metres of boar fence along the top: rebar posts, welded mesh, and a skirt turned outward and pinned down so wild boar cannot root under it. Nothing electric.
About 100 metres of boar fence along the top: rebar posts, welded mesh, and a skirt turned outward and pinned down so wild boar cannot root under it. Nothing electric. · photorealistic render
Photorealistic render. The water and power yard: ground-mounted panels, a cool power room for the batteries, two tanks on a tall steel stand, the well, and a composting toilet. Gravity does the work — there is no pressure pump.
The water and power yard: ground-mounted panels, a cool power room for the batteries, two tanks on a tall steel stand, the well, and a composting toilet. Gravity does the work — there is no pressure pump. · photorealistic render
The homestead

Bellomo Homestead in Contrada Bellomo, Motta d'Affermo, overlooking the sea near Santo Stefano di Camastra.

About 2.2 hectares in Contrada Bellomo, Motta d'Affermo — near Santo Stefano di Camastra — overlooking the sea, already owned outright. Two years of groundwork from raw land: the well is drilled and the water's flowing, the container is on site, the olive trees have been restored, and two harvests prove it all works. Along the way Chris has built a local network of builders and trades, and that network keeps growing.

The plan is to convert an old 8×8 m cistern into a home, convert the container into a home, and then grow an agritourism mixed with tech — booking and guest apps, and product traceability by Linea Tech.

This is a real build, and more investment is needed before the place can earn. Income does not start until that work is done. Partners are not buying a finished house.

What's already here

  • About 2.2 ha overlooking the sea
  • Owned outright
  • Drilled well
  • Cement work on site
  • Shipping container on site
  • Old 8×8 m cistern, to become a home
  • Contrada Bellomo, Motta d'Affermo, near Santo Stefano di Camastra
Ways to participate

A development and investment conversation.

2 · Skin in the game

Involved from day one.

Partners are involved from the moment they put money in.

This land is already Chris's, so there is no property scouting fee here. If you also want to buy nearby land — Romè or the sea-view plot — the scouting fee on those pages is what covers a safe purchase. A later build-out on this homestead, if partners want Homestead Ventures to take it on, is optional and quoted separately when you're ready.

The whole property and project is also available to buy outright for $155,625.

Location

Contrada Bellomo, Motta d'Affermo, Sicily

Near Santo Stefano di Camastra, on the northern coast of Sicily, overlooking the sea.

Photorealistic render. A view of Bellomo Farm from above: cistern home, container, greenhouse, donkeys, beehives, solar and the olive grove.

A view of Bellomo Farm from above: cistern home, container, greenhouse, donkeys, beehives, solar and the olive grove. · photorealistic render

Want to go in together?

Send a message and we'll talk through the homestead, the ventures, and whether a partnership here is a fit.

Ask about partnering →

Homestead Ventures · Contrada Bellomo · Sicily

How we build the homestead.

Infrastructure first, then food systems, then animals.

Photorealistic render. The finished homestead at Contrada Bellomo: the cistern house, the container home, the greenhouse tunnel, the garden and the donkey yard, with hives and panels at the top of the hill.
The finished homestead at Contrada Bellomo: the cistern house, the container home, the greenhouse tunnel, the garden and the donkey yard, with hives and panels at the top of the hill.

01Start

How we build it, step by step

Nothing happens all at once. On a farm, every system needs something else in place first. Water and power come before anything lives here. Food for the animals is growing before the animals arrive. Flowers are in the ground before the bees. Below, each system shows what comes first, and why.

02Build order

How we build the homestead

Nothing happens all at once. We look and plan first, then we secure the site, bring in power and water, make a place to live, grow the food systems, and only then bring in the animals. Products and scale come last.

Two things run alongside from the first year, because they are already alive or they take years to fill in: the olive trees, and the bee flowers and hedges.

Photorealistic render. A view of Bellomo Farm from above: cistern home, container, greenhouse, donkeys, beehives, solar and the olive grove.
A view of Bellomo Farm from above: cistern home, container, greenhouse, donkeys, beehives, solar and the olive grove.

Stage 0 · Look, measure, plan(this winter, 2026–27)

Walk the hill, pick the spots for the greenhouse, donkey yard, tank stand and panels, measure the fence line along the top, test the well and the soil, and plant the first stretch of hedge with a small patch of sulla and borage.

Stage 1 · Secure the site, power and water

About 100 metres of boar fence closes off the top of the property, where the house, water, power and garden sit. Steel rebar posts in small cement holes, welded mesh, the bottom turned outward and pinned down; nothing electric. The rest of the land stays open for now; other areas are penned later, one at a time.

One small solar unit at the cistern house runs the lights, fridge, internet, small tools and the midday well pump. The generator we already own runs the heavy tools and is the backup. The container home and the dome get their own small setups later.

Two tanks sit on a tall steel stand. The well pump fills them at midday, when the panels are strongest, and a float switches it off when they are full. Gravity takes the water to the taps, the drip lines and the animal troughs, with no pressure pump. Automated irrigation waters the garden, the greenhouse, the new hedge and the young trees while we are away.

Stage 2 · Shelter and living

The cistern house: rooms, a composting toilet, greywater, and cooking on bottled gas for now.

Photorealistic render. The cistern house among the olives, with its deck and the hills behind.
The cistern house among the olives, with its deck and the hills behind.

Stage 3 · Food systems

Compost bays, worm beds, a black soldier fly bin, Azolla trays and a pond, drying racks and a pellet mill, a 6 × 12 m greenhouse tunnel, and kitchen gardens on drip. The bee-flower strips are sown in full in October 2027.

Stage 4 · Animals

Chickens first, once the fence, water and feed line are ready. Then five hives of the native Sicilian black bee in spring 2028, after the flowers are in the ground. 2028 is a build-up year; the first real honey harvest is in 2029, and the apiary grows toward about fifty hives on our own land. Then three registered Ragusano jennies, once their dry lot, shelter, hay store and paddock pen are ready. The donkeys live on a dry lot with hay, plus feed we grow, and bought-in feed in the early years. They do not graze a rich pasture.

Stage 5 · Products and scale

Linea Special oil and soap, from our own grove and a few nearby partner farms. Honey and wax. Donkey milk is chilled on the farm and processed in a rented space in town. The container home and later the dome, each with its own small solar setup. Later still, the pottery house: a giant terracotta pot laid on its side, a fourth living space for guests. The herd can grow from three to ten, then twenty; the hives toward about fifty, only as the flowers can feed them.

Photorealistic render. The container home, with a vine pergola over the front deck, a clear rooftop terrace, and the solar water heater on the wooden shade.
The container home, with a vine pergola over the front deck, a clear rooftop terrace, and the solar water heater on the wooden shade.

03Boar fence

The boar fence

Photorealistic render. About 100 metres of boar fence along the top: rebar posts, welded mesh, and a skirt turned outward and pinned down so wild boar cannot root under it. Nothing electric.
About 100 metres of boar fence along the top: rebar posts, welded mesh, and a skirt turned outward and pinned down so wild boar cannot root under it. Nothing electric.

How we build it, step by step

Step 1

Fence the top first. About 100 metres of fence closes off the top of the property, where the house, water, power and garden sit. The rest of the land stays open for now.

Step 2

Simple and strong. Steel rebar posts set in small cement holes, with welded mesh tied on. Nothing electric.

Step 3

Stop the digging. The bottom of the mesh is turned outward and pinned down, so wild boar cannot root under it.

Step 4

Pen the rest one area at a time. The donkey paddock and the orchard get their own fences later, when they are needed.

04Water

Water

Photorealistic render. The water and power yard: ground-mounted panels, a cool power room for the batteries, two tanks on a tall steel stand, the well, and a composting toilet. Gravity does the work — there is no pressure pump.
The water and power yard: ground-mounted panels, a cool power room for the batteries, two tanks on a tall steel stand, the well, and a composting toilet. Gravity does the work — there is no pressure pump.

How we build it, step by step

Step 1

Measure and test the well. We check how deep the water sits and what is in it. Everything else on the farm depends on this.

Step 2

Build a tall steel stand. It rises about 3.5 m on solid concrete footings, because two full tanks weigh about ten tonnes. If there is higher ground near the house, the tanks can sit there on a plain pad instead.

Step 3

Set two large tanks on top. Height does the work. Gravity pushes the water down to the taps, the drip lines and the animal troughs, with no pressure pump.

Step 4

Fit the well pump. It runs only around midday, when the solar panels are at full power, and stops when the tanks are full.

Step 5

Lay the lines and filters. Drinking water passes through filters and a UV lamp. Water for the gardens and troughs only needs a simple filter.

05Irrigation

Watering that runs itself

Photorealistic render. Gravity watering from the tall tank tower: through a filter, valves and a controller, then drip lines in the garden, the greenhouse, the hedge and the flower strips.
Gravity watering from the tall tank tower: through a filter, valves and a controller, then drip lines in the garden, the greenhouse, the hedge and the flower strips.

We are often away for months, so the garden waters itself. Everything runs by gravity from the raised water tanks. There is no pressure pump, and only small battery valves out in the fields.

Step 1

Water up high, refilled by the sun.

Two tanks sit on a tall steel stand by the cistern house. At midday, when the solar panels are strongest, the well pump fills them. A float switches it off when they're full. Gravity does the rest.

Step 2

Four zones on a timer.

A small battery-powered timer opens four low-pressure valves, one zone at a time, early each morning:

  • the vegetable garden
  • the greenhouse tunnel
  • the new bee hedge and young trees (for their first one or two summers)
  • the bee flower strips (only while they settle in)

A filter keeps the drip lines clean, and a rain sensor skips watering after rain.

Step 3

Slow drops at the roots.

Drip lines and small drippers made for low pressure put water straight onto the soil, under mulch, so very little is lost to the sun and wind. Once the hedge and trees are rooted, they live on rain alone.

Numberabout 4,500 L a week for the vegetable garden, 2,500 L for the greenhouse and 3,000 L for the hedge and young trees in the height of summer. That's about 10,000 L a week, the same as the two tanks hold, and the well tops them up every day.

Photorealistic render. The irrigation parts: a battery timer, valves, a filter, a rain sensor, a float, drip line and fittings.
The irrigation parts: a battery timer, valves, a filter, a rain sensor, a float, drip line and fittings.

How we build it, step by step

Step 1

Water up high. With the tank stand, we fit a filter and a small box of valves at the foot of the tanks. Everything flows by gravity, with no pressure pump.

Step 2

Let the sun refill the tanks. A float and a midday timer let the well pump top up the tanks on its own, only when the panels are strongest.

Step 3

Four zones on a battery timer. A small battery timer opens one low-pressure valve at a time, early each morning, for four zones: the vegetable garden, the greenhouse tunnel, the bee hedge and young trees (first one or two summers), and the bee flower strips (only while they settle). A rain sensor skips watering after rain.

Step 4

Drip at the roots. Drip lines made for low pressure go in as each zone is ready, under mulch, so little water is lost.

Step 5

Check before long trips. Clean the filter, run each zone once and check the batteries. Then it runs on its own for months.

Numberabout 10,000 L a week in high summer across the garden, greenhouse, hedge and young trees, the same as the two tanks hold. The well tops them up every day.

06Energy

Energy, one source at a time

We cover every kind of energy the farm needs, and add each one in stages: sun first, then gas, then wood pellets and hot water from the sun, and one day methane from our own animals.

Photorealistic render. Step 1, cooking on gas bottles now.
Step 1, cooking on gas bottles now.
Photorealistic render. Step 2, pellet cooker with oven, runs without electricity.
Step 2, pellet cooker with oven, runs without electricity.
Photorealistic render. Step 3, later, pigs feed a biogas digester that makes cooking gas.
Step 3, later, pigs feed a biogas digester that makes cooking gas.

1. Electricity from the sun

Step 1

One small solar unit.

Panels south of the cistern house charge one battery unit in a cool power room.

Step 2

Light loads on the sun.

It runs the lights, fridge, internet, small tools and the well pump at midday.

Step 3

The generator for heavy work.

The generator we already own runs the welder and the feed mill, and backs up the solar in long grey spells. The container home and the dome get their own small setups later.

Numberabout 8 kWh a day in winter, and the panels make about 11 kWh on a December day.

2. Cooking gas, for now

Step 1

Gas bottles.

We cook on bottled gas from local dealers.

Step 2

Always one spare.

Two bottles sit on a changeover valve, in a shaded, ventilated cage outside, so one is always full.

Step 3

Gas becomes the backup.

Once the pellet stove is in, gas covers summer cooking and the odd quick meal.

Numberabout 4 kg of gas a month for cooking.

3. Wood pellets for cooking and heat

Step 1

A pellet cooker with an oven.

It needs no electricity at all. We light it by hand and it draws through its own chimney.

Step 2

One stove, three jobs.

It cooks on the top, bakes in the oven and warms the house through the winter.

Step 3

Local fuel.

Wood pellets are made and sold here in Sicily. We buy one pallet before each winter and keep it dry.

Numberabout 750–1,050 kg of pellets a winter (50–70 bags).

4. Hot water from the sun

Photorealistic render. The solar water heater on each home: glass tubes catch the sun and heat the tank on top.
The solar water heater on each home: glass tubes catch the sun and heat the tank on top.

What it is. A solar water heater is a row of glass tubes with a hot-water tank across the top — the same kind you see on rooftops all over Sicily. Each home gets its own. On the cistern house it sits on the roof terrace. On the container it sits on the wooden shade over the front deck, so the rooftop living space stays clear. On the dome it sits on the flat roof of the bathroom building, so the tank is higher than the shower.

How it works. Each glass tube works like a thermos that traps the sun's heat. The heat moves up into the tank, and hot water rises on its own, with no pump, no wiring and no bill. Cold water comes down from the high tanks into the heater, and hot water runs down to the showers and sinks by gravity.

Why it matters. Hot showers and washing water for every home come straight from the sun, with our own energy. About 50 litres per person a day. The sun covers about 70–80% over the year, and nearly all of it from April to October. A small gas heater, run from the same bottles we already use for cooking, tops it up on grey winter days so there is always hot water.

5. Later: methane from pigs

Step 1

Animals first, then the digester.

Pigs come only after the chickens, bees and donkeys are settled, in their own pen with a concrete floor and nothing electric.

Step 2

A small digester.

Each day their dung and our kitchen scraps go into a sealed bag digester in the sun. Bacteria turn them into methane for the stove, with no electricity.

Step 3

Nothing wasted.

What comes out is a liquid fertiliser for the garden drip, and the solids go to the compost.

Numberabout 1 m³ of biogas a day from about five pigs and our scraps, enough for daily cooking.

How we build it, step by step

Step 1

Sun first. One small solar unit at the cistern house runs the lights, fridge, internet, small tools and the midday well pump. The generator we already own runs the heavy tools and is the backup.

Step 2

Gas bottles for cooking, for now. Two bottles on a changeover valve, in a shaded cage outside, so one is always full.

Step 3

Next, a pellet cooker with an oven. It needs no electricity: we light it by hand and it draws through its own chimney. It cooks, bakes and heats the house on local wood pellets.

Step 4

Hot water from the sun. Each house gets its own solar water heater: a row of glass tubes with a tank across the top, the kind you see on Sicilian rooftops. Each tube works like a thermos; the heat rises into the tank on its own, with no pump, no wiring and no bill, and hot water feeds the house by gravity. On the cistern house it sits on the roof terrace; on the container it sits on the wooden shade over the front deck, so the rooftop living space stays clear; on the dome it sits on the flat roof of the bathroom building. A small gas heater on the cooking bottles tops it up on grey winter days so there is always hot water.

Step 5

Later, methane from pigs. Only after the chickens, bees and donkeys are settled, a few pigs in their own pen feed a small digester. Their dung and our kitchen scraps become cooking gas, and the leftovers become fertiliser for the garden.

Numberabout 8 kWh of electricity a day in winter; about 4 kg of cooking gas a month; about 750–1,050 kg of pellets a winter; about 50 litres of hot water per person a day, with the sun covering about 70–80% over the year; later about 1 m³ of biogas a day.

07Waste

Waste management, back into the land

Photorealistic render. Private guest bathroom, modern Sicilian style, walk-in shower, high-end composting toilet.
Private guest bathroom, modern Sicilian style, walk-in shower, high-end composting toilet.

We treat waste the way we treat energy: in stages, and nothing is thrown away. Each house has a private bathroom with a shower, in a modern Sicilian style. The toilet uses no water. Urine, solids and water from the sinks and showers each go their own way, and all of it feeds the trees and the gardens.

What is a composting toilet?

A composting toilet looks and feels like an ordinary bathroom toilet, but it uses no water at all. A hidden divider in the bowl sends urine one way and solids the other, so nothing sits in a puddle and there is no flush. A tiny fan, run on our solar power, pulls air up a pipe through the roof, so the room stays fresh and there is no smell. The solids rest outside in closed bins for a full year, until they become compost for trees. Most people have never seen one: this is a high-end Swedish urine-diverting dry toilet, fitted in a proper indoor bathroom, not an outhouse.

1. A dry toilet in every house

Step 1

Plan it with the rooms.

The vent pipe and the urine line are planned while the walls and roof go up, not after.

Step 2

Fit the toilet.

Each private bathroom — in the cistern house, the container home and the dome — gets a high-end Swedish urine-diverting dry toilet. It uses no water. A small fan, run on solar, pulls air out through a pipe above the roof, so there is no smell.

Step 3

Built for guests and helpers too.

They use the same kind of toilet, in a modern Sicilian bathroom with a walk-in shower. Where use is heavier, a version with a larger bin under the floor can be emptied from outside.

Numberthe fan uses about 0.06 kWh a day. Compared with a flush toilet, we save about 35 litres of water per person a day, about 13,000 litres a year.

Photorealistic render. Outdoor work-area toilet.
Outdoor work-area toilet.

2. Urine, solids and shower water

Photorealistic render. Cutaway: toilet, vent pipe through the roof, urine line to buried tank, solids resting bins, reed bed for sink and shower water.
Cutaway: toilet, vent pipe through the roof, urine line to buried tank, solids resting bins, reed bed for sink and shower water.

Step 1

Urine to a buried tank.

It runs through a pipe to a tank in the ground. Diluted with irrigation water, it becomes liquid fertiliser for the olive trees.

Step 2

Solids rest for a year.

They go into a bag, then into outdoor bins, and rest for a full year. The finished compost goes on olive trees and ornamental plants, never on vegetables.

Step 3

Clean the sink and shower water too.

Water from the sinks, the showers and the washing machine flows through a grease trap and a reed bed, then waters the olives underground.

Numberone person makes about 500 litres of urine a year, and about 60 litres of solids (est.). After a year of rest, that compost is for trees only.

3. The farm compost loop

Photorealistic render. Three bays: fresh, rotting, finished; donkey manure and straw beside.
Three bays: fresh, rotting, finished; donkey manure and straw beside.

Step 1

Build the compost bays first.

Three wooden pallet bays (fresh, composting, finished) go in before any animal arrives, so manure always has a place to go.

Step 2

Start with what we already have.

Kitchen scraps, straw, olive prunings and, later, donkey manure build the piles. Worm beds in the shade turn the aged compost into very rich soil for the gardens.

Step 3

Return it to the land.

The gardens, the greenhouse and the olive trees grow on that compost. Nothing useful leaves the farm.

Numberthree donkeys make about 30 kg of manure a day, about 11 tonnes a year, plus straw.

08Compost

Compost, black soldier fly and worms

Photorealistic render. Three bays: fresh, rotting, finished; donkey manure and straw beside.
Three bays: fresh, rotting, finished; donkey manure and straw beside.

How we build it, step by step

Step 1

Build the compost bays first. Three wooden pallet bays on packed ground: fresh, composting, finished. Later we can upgrade to permanent concrete bays.

Step 2

Start with what we already have. Olive prunings, kitchen scraps, straw and olive pulp from the mill start the first piles.

Step 3

Set up the worm beds. Shallow beds sit in the shade. The worms turn aged compost into very rich soil.

Step 4

Add the black soldier fly bin. The larvae eat kitchen scraps fast. When they are ready, they crawl out on their own into a bucket.

Step 5

Return it to the land. The finished "black gold" compost feeds the gardens, the greenhouse and the olive trees.

Step 6

Grow with the animals. When the chickens and donkeys arrive, their manure joins the bays, and we add more bays as the herd grows.

09Our own feed

Growing Our Own Feed

Photorealistic render. Azolla in shallow tanks, drying racks, and a small mill pressing pellets for the chickens.
Azolla in shallow tanks, drying racks, and a small mill pressing pellets for the chickens.

The farm makes a high-protein feed from what it already grows and from what would otherwise be thrown away.

What we grow. Azolla, a small floating fern, lives in shallow shaded tanks and is harvested every few days. Black soldier fly larvae are raised on kitchen scraps, manure and spent olive pomace. When they are ready, they crawl out into a collection bucket.

How we make the pellets. Both harvests are dried, then ground and pressed in a small pellet mill, often with a little grain. The pellets are stored dry and fed out as needed.

Who they feed, and when. The pellets are for the chickens first. Later they can be a small supplement for the donkeys. The donkeys still live mostly on hay, straw and forage. In the early years this does not replace bought-in feed altogether, but it cuts how much we have to buy.

Why the protein matters. Dried black soldier fly larvae are typically around 42 percent protein. Dried Azolla is typically around 20 to 22 percent. Mixed together, they make a dense feed from the farm's own waste and water plants.

How this closes the loop. Manure and scraps feed the compost bays, the worm beds and the larvae. What the animals don't eat, and the compost they make, goes back to the gardens, the hoop house and the olive trees. Almost nothing leaves the farm as waste.

Photorealistic render. How the farm feeds itself: the houses and garden, compost and feed, hives, and donkeys on a dry lot with hay in the shelter — not a rich pasture.
How the farm feeds itself: the houses and garden, compost and feed, hives, and donkeys on a dry lot with hay in the shelter — not a rich pasture.

How we build it, step by step

Step 1

Water and shade first. Azolla, a small floating fern, needs clean water from our tanks and shade from the hard Sicilian sun.

Step 2

Start small in tanks. Shallow trays are seeded with a little Azolla. It doubles fast and is harvested every few days.

Step 3

Then build the pond. Once the trays are thriving, a larger lined pond gives a steady supply.

Step 4

Dry the harvests. Azolla and the dried larvae from the compost area are dried on racks in the sun and in a small dryer.

Step 5

Grind and press the pellets. On our generator, a small mill grinds them with a little grain and presses them into pellets.

Step 6

Feed the chickens first. The donkeys get a small Azolla-and-grain extra later, on top of their hay. In the early years this cuts, but does not replace, bought feed.

10Bee flowers

Flowers for the Bees

Photorealistic render. Flowering strips between the olive rows, hives near the house and lower on the slope, the greenhouse tunnel and the donkey yard.
Flowering strips between the olive rows, hives near the house and lower on the slope, the greenhouse tunnel and the donkey yard.

The honey comes from what blooms around the hives, not from the olive flowers. Olive blossom gives the bees pollen in May and June, but no nectar. So we plant a year-round forage on our own land: flowering strips between the olive rows, native drifts on the banks, and mixed hedges along the walls.

A few hives sit near the house. Most sit lower down the shaded hillside. We start with five hives and grow toward about fifty, all on our own land. Bees also fly out into the wider hills, so this planting is not the whole of their diet. It gives our colonies, and the wild bees, more food on the farm itself, and it helps carry them through the dry summer gap.

What one hive gives

These are rough estimates for a normal year: about 12 kg of honey per hive. A dry year can be much lower.

HivesHoney in a normal year
1about 12 kg
5about 60 kg
15about 180 kg
30about 360 kg
50about 600 kg

What we plant. Only Sicilian and Mediterranean natives, in drifts of ten or more:

  • sulla between the olive rows (it is also hay for the donkeys, cut after it flowers)
  • borage, clovers, and viper's bugloss (Echium) on the dry margins, kept out of the donkey paddocks
  • capitate thyme, rosemary, French lavender (Lavandula stoechas) and Sicilian oregano
  • wild fennel, calamint and chaste tree for the dry summer
  • caper on the old walls
  • carob, myrtle and strawberry tree in the hedges

We leave wild inula and fennel on the margins where they already grow. Citrus blossom in April comes from groves in these hills; a few trees can go in near the house. The ground cover is mown only after it flowers, and nothing is sprayed while it blooms.

Bloom through the year

MonthIn bloomWhat we sow or plant
JanRosemary, almond, loquat, wild mustardsPlant shrubs and trees in mild spells
FebRosemary, early borage, mustards, asphodelSow borage; plant herbs
MarSulla starts, borage, viper's bugloss, fruit trees, French lavenderSow sulla if it was not sown in autumn; plant thyme and lavender
AprCitrus, sulla, clovers, borage, viper's buglossMain spring flow. Leave the mower parked
MaySulla ends, thistles, olive pollen, thyme starts, myrtle, caperKeep the ground cover standing until it has flowered
JunThyme, chestnut in the hills, wild fennel, chaste tree, oregano, caperSummer plants take over as the coast dries
JulFennel, chaste tree, calamint, oregano, late thymeThe dry gap begins. Leave the bees their honey, and give them water and shade
AugFennel, chaste tree, calamint, early inulaThe hardest month. The summer plants have to carry the hives
SepInula, carob, ivy, calamintAutumn recovery
OctIvy, carob, inula, strawberry treeWinter stores go into the hives
NovStrawberry tree, rosemary, late carobPlant woody hedges and trees
DecStrawberry tree, rosemary, loquatThe Sicilian bee starts brood on these winter flowers
Photorealistic render. A year-round forage for the bees: flowering strips, shrubs and trees around the hives in the olive grove.
A year-round forage for the bees: flowering strips, shrubs and trees around the hives in the olive grove.
Photorealistic render. Hives among the olives and the flower strips.
Hives among the olives and the flower strips.

How we build it, step by step

Step 1

Plant the flowers first. Hedges and shrubs go in during the first winter, with a small patch of sulla and borage sown straight away. The full flower strips are sown between the olive rows the next autumn. They need time to bloom.

Step 2

Prepare the hive spots. A few spots near the house, most lower on the shaded hillside. Each hive gets a stand off the ground, morning sun, afternoon shade, and a water point.

Step 3

Bring in five hives. In the spring after the full sowing (spring 2028), with the strips in flower, we start with five colonies of the native Sicilian black bee.

Step 4

Let them build up. The first hive year is a build-up year, for growing strong. We take little or no honey and leave the bees their stores.

Step 5

Split and grow toward fifty. Each spring, strong colonies are split into new hives. We only add hives as fast as the flowers can feed them.

Step 6

Harvest honey and wax. About 12 kg of honey per hive in a normal year from year two. The wax goes into our olive-oil soap and the donkey-milk cream.

11Chickens

Chickens

Photorealistic render. Coop on legs inside a rebar-and-mesh run, gravity drinker and feeder.
Coop on legs inside a rebar-and-mesh run, gravity drinker and feeder.

How we build it, step by step

Step 1

Fence and water first. The boar fence is up and water reaches the coop by gravity before any bird arrives.

Step 2

Build a predator-proof coop. A sturdy coop with a covered run sits inside the fence, close to the compost area.

Step 3

Get the feed system running. The larvae bin and the Azolla tanks are already producing. We start with bought feed and add our own as it grows.

Step 4

Bring in about ten hens. A small flock is easy to learn with.

Step 5

Close the loop. The hens lay eggs, eat our pellets, scratch through the compost, and their manure goes back to the bays.

Step 6

Grow the flock ourselves. Later, an incubator lets us hatch our own chicks.

12Donkeys

Donkeys

Photorealistic render. Ragusano donkeys at their open-front shelter and dry lot.
Ragusano donkeys at their open-front shelter and dry lot.

How we build it, step by step

Step 1

Pen, water and compost first. The donkey paddock gets its own boar-proof pen of rebar posts and mesh, with nothing electric. The water lines and the compost bays are in place before the donkeys come.

Step 2

Build the yard. An open-front shelter with a deep porch for summer shade, a dry yard without rich grass, foal pens, a small milking room and a hay store, all under one roof.

Step 3

Line up the food. Hay is stored, and the sulla between the olive rows gives its first hay cut. We also buy hay and feed in the early years.

Step 4

Bring in three jennies. We start with three registered Ragusano jennies, one of Europe's rarest breeds.

Step 5

Start milking gently. The foal always drinks first. We take only a modest share of the milk each day.

Step 6

Grow step by step. The building is a row of bays, so it grows from three to ten, then twenty. There is land nearby if we need more pasture.

13Olives

Olives

Photorealistic render. The olive and soil tools: a walk-behind tiller, two battery shakers, nets, a chainsaw and a harvest crate under the trees.
The olive and soil tools: a walk-behind tiller, two battery shakers, nets, a chainsaw and a harvest crate under the trees.

How we build it, step by step

Step 1

Start with the trees we have. Olive trees already stand on the land. The first oil came off them in 2026.

Step 2

Prune and bring them back. Right after each harvest, through the winter, we prune and clean up the trees, starting with the neglected ones on the slopes.

Step 3

Feed the soil. Flowering ground cover grows between the rows and is mown only after it blooms. Our compost goes around the trees.

Step 4

Harvest by hand. In October and November, olives fall onto nets and are pressed the same day at a local mill.

Step 5

Bottle under our name. Oil from our own grove and a few nearby partner farms is bottled as Linea Special, each kept apart and dated. Same thinking as the donkeys: start small and grow.

Step 6

Make soap. Our olive oil, with beeswax from our own hives, becomes a pure olive-oil bar.

14Greenhouse

Greenhouse

Photorealistic render. The greenhouse tunnel and kitchen garden, watered by drip from the tanks.
The greenhouse tunnel and kitchen garden, watered by drip from the tanks.

How we build it, step by step

Step 1

Read the land. We watch where the strong winds hit and pick a flat, sheltered spot with full winter sun, inside the fenced top of the farm.

Step 2

Plant the windbreak first. A hedge on the windy sides goes in early, because it takes years to grow.

Step 3

Level and anchor. We level a strip about 6 by 12 metres and set strong ground anchors, so the tunnel holds in the hill winds.

Step 4

Raise the tunnel. Steel arches go up, then the plastic cover, with roll-up sides and doors at both ends for summer air.

Step 5

Fit it out. Benches, drip lines from the tanks and summer shade cloth go in. Water barrels inside store warmth for winter nights.

Step 6

Start growing. In spring we take the first cuttings and grafts of olives, citrus, figs and native plants, and raise seedlings for the gardens and the bee flowers.

15Tools

Tools & machinery

Tools & machinery: fully equipped, fully independent

Bellomo is set up to run on its own tools. Every recurring job on the farm, from building and welding to pruning, harvest, beekeeping, milking and processing, is covered by equipment kept on site, so the work never waits on borrowed machines. Equipment arrives step by step, in step with the build phases.

Already on site: a 5,000 W Hyundai inverter gasoline generator, a professional brush cutter, plus shovels, pickaxes and the other basic hand tools.

Land & groves

  • A compact mini excavator (1.5–2.5 t) is hired for fence lines, footings, trenches and water lines, until a used machine is bought later
  • Petrol rototiller, petrol post-hole auger, digging bars and hand tools
  • Walk-behind flail mower for firebreaks and the ground under the olives
  • Chainsaw, telescopic pole pruner and a full hand-pruning kit to recondition the olive trees
  • Petrol wood chipper that turns prunings into mulch, compost and bedding; log splitter for firewood

Olive oil & soap (Linea Special)

  • Battery-powered olive harvesters, anti-thorn harvest nets and ventilated crates
  • Cold extraction at the local mill, with every grove and variety pressed separately
  • Stainless steel storage tanks with floating lids (inert-gas blanketing as volumes grow), one tank per batch
  • Bench quality testing for acidity and peroxides on every batch
  • Gravity bottle filler and labeling station for harvest-dated bottles and tins
  • Soap workshop: precision scales, heavy-duty blender, molds, curing racks and full protective gear. About 11–12 bars of pure olive-oil soap come from every litre of oil

Bees & honey (Sicilian Grove Honey)

  • 5 Dadant-Blatt hives to start, growing to about 50, stocked with local colonies
  • Motorised stainless radial extractor, stainless settling tanks, uncapping bench and filters
  • Ventilated suits, smokers and hive tools for the team and visiting guests
  • Solar wax melter: the beeswax goes into the donkey-milk cream and the olive-oil soap

Ragusano donkeys & donkey milk

  • Open-front timber stable sized at about 8 m² of bedded cover per jenny, with a separate foaling box, a hay store and a hard-standing dry lot, plus fenced paddocks for rotation
  • Constant-level water troughs, covered hay feeders, hoof-care and grooming kits
  • Milking on the farm, processing in a rented space in town (the milk is carried down daily):
    • trolley milking machine set up for donkeys
    • immediate chilling in a small milk fridge on the farm
    • a 50 L batch pasteuriser
    • a −25 °C pre-freezer
    • a commercial freeze dryer that turns the milk into shelf-stable powder
    • sealed Mylar packaging
  • Scales with the herd, from 3 to 10 to 20 jennies; the cream and soap line follows once the milk is proven

Food systems & closed loop

  • Feed chopper and pellet mill for the farm's own feed
  • Azolla pond setup: IBC raceways and a lined pond, watered from the well, under shade cloth, with harvest nets and drying racks. Dried Azolla, with black-soldier-fly larvae, is milled into animal feed
  • Stainless food dehydrators (Azolla, larvae, fruit, herbs)
  • Worm bins on donkey compost, black soldier fly bins and Azolla tanks
  • Year-round 6 × 12 m tunnel greenhouse with drip irrigation
  • Predator-proof chicken coop and egg incubator

Power & water

  • Minimal off-grid solar with battery storage (one modular unit at the cistern house, later separate units for the container home and the dome), backed by the 5,000 W Hyundai inverter generator already on site
  • Midday solar well pump filling raised tanks for gravity-fed water (no pressure pump), potable storage, filtration and UV treatment
  • Composting toilets in every dwelling

Workshop & maintenance

  • Cordless drill and impact driver on shared batteries, an SDS-plus hammer drill, angle grinders and a circular saw
  • Multiprocess inverter welder (MMA/MIG), compressor and cement mixer
  • Full mechanic's set, a stock of spares, and electrical and plumbing tool kits, so machines and systems are serviced on site
  • Workbench and a secure, dry tool-store container

Transport

  • Honda 4×4 quad with a tipping cart for the slopes
  • Road trips for hay, mill runs, feed and materials are made with a hired van until a farm 4×4 with a flatbed is bought

Safety

  • Chainsaw protective gear, general PPE, first aid with an eyewash station
  • Fire extinguishers, hose reel and maintained firebreaks for the summer season

Fencing

  • Wild-boar fence in heavy mesh, built and maintained on site. No electric fence. The fencing tools are a rebar cutter and grinder, a post-hole auger, mixing tubs, a fence stretcher and tie-wire pliers

16Dream Toolkit

Dream Toolkit

The aim is full self-sufficiency. A homestead runs on its own hands. We're off-grid and self-sufficient by design, so we build, repair, harvest and grow without waiting on anyone else. Owning our own tools means that when a problem comes up, or a job needs doing on the farm, we handle it ourselves straight away, without waiting or searching for someone else. The right tools on site make that possible. They also stay with the farm, so whoever takes it on later gets a working homestead, not just land.

The dream kit is the whole set, but nothing has to be bought in one shot. We start with the working tools, then add the big machines step by step as the farm grows.

This is a rough estimate, mixing used and new depending on the deals we find.

Stage 1 · Working tools

The first kit we raise for: the workshop, the walk-behind hillside machines, and the olive and soil tools.

Photorealistic render. The working tools of the homestead: workshop set, safety gear, and the generator already on the farm.
The working tools of the homestead: workshop set, safety gear, and the generator already on the farm.
  • Cordless drill and impact driver, shared batteries and charger€250–€460
  • Corded SDS-plus rotary hammer€100–€260
  • Angle grinders€100–€260
  • Circular saw€80–€170
  • Inverter welder, helmet and clamps€500–€1,120
  • Layout tools (level, tape, square and clamps)€200–€400
  • Wheelbarrow and site tools€250–€450
  • Outdoor extension reel€80–€150
  • Safety gear (boots, gloves, glasses, ear defenders)€100–€200
  • Walk-behind flail mower€1,300–€4,480
  • Petrol post-hole auger€120–€300
  • Wood chipper€700–€2,770
  • Electric log splitter€280–€615
  • Cement mixer€150–€1,560
  • Walk-behind rototiller (Honda motozappa)€500–€1,300
  • Two battery olive shakers€700–€1,920
  • Harvest nets for about eight trees and more€300–€340
  • STIHL MS 261 C-M chainsaw€450–€910
  • STIHL HT 105 pole pruner€500–€1,150
  • Basic hand tools already on the farm€0
  • Hyundai 5,000 W generator, already on the farm€0

Stage 1 total: about €6,700–€19,000.
Estimated to raise, give or take: about €13,000.

Stage 2 · Mini excavator

Until this stage, the excavator is rented. When we are ready, we buy our own machine, a plant trailer and a diesel tank.

Photorealistic render. The bigger machines, added as the farm grows: a mini excavator and trailer, a farm truck, a slope mower, and the walk-behind hillside machines.
The bigger machines, added as the farm grows: a mini excavator and trailer, a farm truck, a slope mower, and the walk-behind hillside machines.
  • Used mini excavator, 1.5–2.5 t€12,500–€18,000
  • Plant trailer, 2.7–3.5 t€2,800–€7,850
  • Diesel tank, 440 L, with pump€670–€900

Stage 2 total: about €16,000–€27,000.
Estimated to raise, give or take: about €19,000.

Stage 3 · Farm vehicles and slope mower

A work truck for the road, a trailer for hay and harvest, and a remote-control mower for the steeper slopes.

  • Used 4x4 flatbed farm truck€15,000–€41,900
  • Road trailer, 750 kg, plus a tow bar€600–€2,500
  • Remote-control tracked slope mower€2,500–€6,500

Stage 3 total: about €18,000–€51,000.
Estimated to raise, give or take: about €28,000.

Full dream toolkit

Estimated total to raise, give or take: about €60,000.
The full low-to-high band, if every line is bought at the cheapest used option or at the top new price, is about €41,000–€96,000. The tools stay with the farm, so it can change hands as a working homestead.

Dream builds for this land

Add-on ideas designed for this property, for later, if space allows. The cistern and container homes come first.

17Dome

The dome home, for guests and helpers

Photorealistic render. The white dome set into the hillside, with a roofed outdoor kitchen and solar panels on its roof, and the bathroom building with the solar water heater on its flat roof.
The white dome set into the hillside, with a roofed outdoor kitchen and solar panels on its roof, and the bathroom building with the solar water heater on its flat roof.

The third living space is a white dome, about seven metres across, with a large triangular window looking out to the sea. It is a fully functional home of its own, for paying guests and for the helpers who come to work on the farm. We build it into the hillside, so the flat open row of olives stays clear.

1. The dome in the hillside

Step 1

Cut a level shelf into the slope.

A low dry-stone wall holds the bank at the back, and a drain sits behind the wall.

Step 2

Raise a timber deck, then the dome.

The white dome stands on that deck, set into the hill, with the big window facing the view.

Step 3

Join it to the farm.

Stone paths and gravity water run from the high tanks down to the dome, with no pump.

Numberabout 38 square metres inside, comfortably for two guests, or up to four.

2. Outdoor kitchen and bathroom

Step 1

A roofed outdoor kitchen beside the dome.

A timber roof, a stone counter, a sink, a small wood-fired oven and a dining table. The dome's own solar panels sit on that kitchen roof.

Step 2

A small bathroom building of its own.

It is a modern Sicilian bathroom with a walk-in shower and the same dry toilet as the other houses. The solar water heater sits on its flat roof, so the tank is higher than the shower.

Step 3

Its own small solar unit.

Lights, a fridge, a fan, phone charging and internet run on the dome's own panels and battery, not on the house system.

Numberthe battery stores about 8 kWh, enough for the daily light loads.

3. Guests and helpers

Step 1

Finish it for year-round use.

A small pellet stove, lit by hand with no electricity, warms the dome on winter evenings.

Step 2

Helpers first, when it is free.

When the dome is not booked, the people who come to help on the farm stay here.

Step 3

Then paying guests.

It is rented as a stay with a private bathroom, an outdoor kitchen and a sea view.

Numberthe guest rate is about €80–150 a night. A cautious outlook is about 80–120 paying nights a year, once the dome is known, so about €6,400–18,000 a year. Helpers use the quieter months.

18Pottery house

The pottery house, a later guest stay

A one-of-a-kind house we want to build. Just along the coast is Santo Stefano di Camastra, Sicily's town of ceramics, where clay has been shaped and painted for centuries. Our pottery house will be a tribute to it: a giant hand-finished terracotta jar, laid among the olives high above the sea. It won't be a hotel room. It will be a piece of art you can sleep in, with nothing else like it here. We're looking for investors and people who want to help bring it to life, so that one day guests can stay inside it.

The fourth living space will be a giant terracotta pot, laid on its side among the olives. The front will open in a rough stone arch with a tall glass door, and at the far end a matching arched glass door will look out over the hills to the sea. It will be a small, artsy stay for two guests. We plan to build it later, after the cistern house, the container home and the dome.

1. How we plan to build the pot

Step 1

A stone base and a steel half-ring skeleton.

The skeleton will already have the shape of the pot, with the two door arches and the openings for the windows.

Photorealistic render. Step 1, as we plan it: a stone base and a steel half-ring skeleton, already in the shape of the pot, with the arches of the doors and the openings for the windows.
Step 1, as we plan it: a stone base and a steel half-ring skeleton, already in the shape of the pot, with the arches of the doors and the openings for the windows.

Step 2

Steel mesh and one thick insulating cement shell.

The mesh will be tied to the skeleton, then a single thick shell will be laid over it, with the steel inside.

Step 3

A terracotta clay and lime finish.

The wall will be just two materials: the thick insulating shell with the steel inside, and the clay skin.

Photorealistic render. How the wall will be made: one thick insulating cement shell with the steel inside, and a terracotta clay skin over it.
How the wall will be made: one thick insulating cement shell with the steel inside, and a terracotta clay skin over it.

Numberit will be about 8 metres long and 3.5 metres wide, about 25 square metres inside.

Photorealistic render. The pottery house we want to build at Contrada Bellomo: a giant terracotta pot laid on its side among the olives, with a stone-arch doorway and the sea behind.
The pottery house we want to build at Contrada Bellomo: a giant terracotta pot laid on its side among the olives, with a stone-arch doorway and the sea behind.

2. A complete little home inside

Step 1

A kitchen by the door, and a small bathroom behind a curved wall.

The kitchen will have a sink, a hob, a small oven, a fridge and open shelves. The bathroom will have a shower, the same dry toilet as the other houses, and an arched wooden door.

Step 2

A living area.

A curved built-in sofa will follow the wall, with a table for two.

Step 3

A raised double bed with drawers underneath.

It will sit at the far end, by the arched glass door that will look out over the hills to the sea. A round skylight and small arched side windows will bring in light. The walls will be warm terracotta, like the outside of the pot, and the floor will be terracotta too.

Numberit will be a complete little home for two, about 25 square metres.

Photorealistic render. Inside the pottery house as we plan it: warm terracotta walls, a kitchen by the door, a small bathroom behind a curved wall, a living corner with a sofa and a table for two, and a raised bed at a matching arched glass door looking out over the hills to the sea.
Inside the pottery house as we plan it: warm terracotta walls, a kitchen by the door, a small bathroom behind a curved wall, a living corner with a sofa and a table for two, and a raised bed at a matching arched glass door looking out over the hills to the sea.

3. Water, sun and guests

Step 1

Join it to the farm.

Gravity water will run from the high tanks down to the pot, with no pump. The same solar water heater as the other houses will give hot water from the sun.

Step 2

Its own small solar unit.

Lights, the fridge, a fan, phone charging and internet will run on the pottery house's own panels and battery, not on the house system.

Step 3

Then paying guests.

It will be rented as a stay with a private kitchen, a bathroom and a sea view. The guest rate will be about €80–150 a night, the same range as the dome.

Outlook, one pottery house, first full season. This is an outlook, not a promise. It does not include breakfast, extras or cleaning time.

NightsRateYear
Careful80€80€6,400
Mid100€115€11,500
Strong120€150€18,000

Questions about the build?